

DESKTOP/ WEB
Tutorial & Knowledge Guide


HOW TO LOG-IN
Begin by navigating to https://app.connectuc.io/ and sign in with your PBX credentials.

Important: To log in to ConnectUC, you'll need to use your UCaaS username (typically extension@domain).
You will not be able to use the same account as you use for your admin portal.
After the initial log-in, you will see a red banner at the top asking you to allow ConnectUC to play audio for incoming calls. You may also be asked to allow permissions for other functions within the app when they are required (i.e., video permissions for initiating a video call).

To access user settings and preferences, report an issue, or sign out, click on the user icon found on the left side of the screen.

Once signed in, you can select the function/feature you want from the left-side menu. Please note that some features, such as SMS, Fax, and Voicemail Transcription must be enabled by an Administrator and may not appear for all users.


VOICEMAIL
The Voicemail tab allows you to view, listen, download, and read transcripts for voicemails you have received. After clicking on an individual voicemail, you also have the option to call the number back within the app, forward the voicemail to another contact, or delete the voicemail.

Once a new voicemail is received, a red number icon will appear in the voicemail tab. Once you have reviewed a voicemail in this tab, it will be “Marked as Read,” and the indicator will be removed. You may also mark a voicemail as Unread if you wish (pictured above on the top-right side of the page).

After clicking on an individual voicemail, you also have the option to call the number back within the app or delete the voicemail.
To call the voicemail number back from within the Voicemail tab, simply hover your mouse over the voicemail entry and click the “Phone” icon.

PARKING
The Parking tab allows you to view a list of Parked Calls.

Calls are parked by clicking the 'Park' button during an active call.

CHAT
The Chat tab allows you to view and manage chat conversations, create new chat conversations, and call or video conference.

Similar to the Voicemail tab, new chat messages/conversations will trigger a red number icon to indicate the number of unread messages.

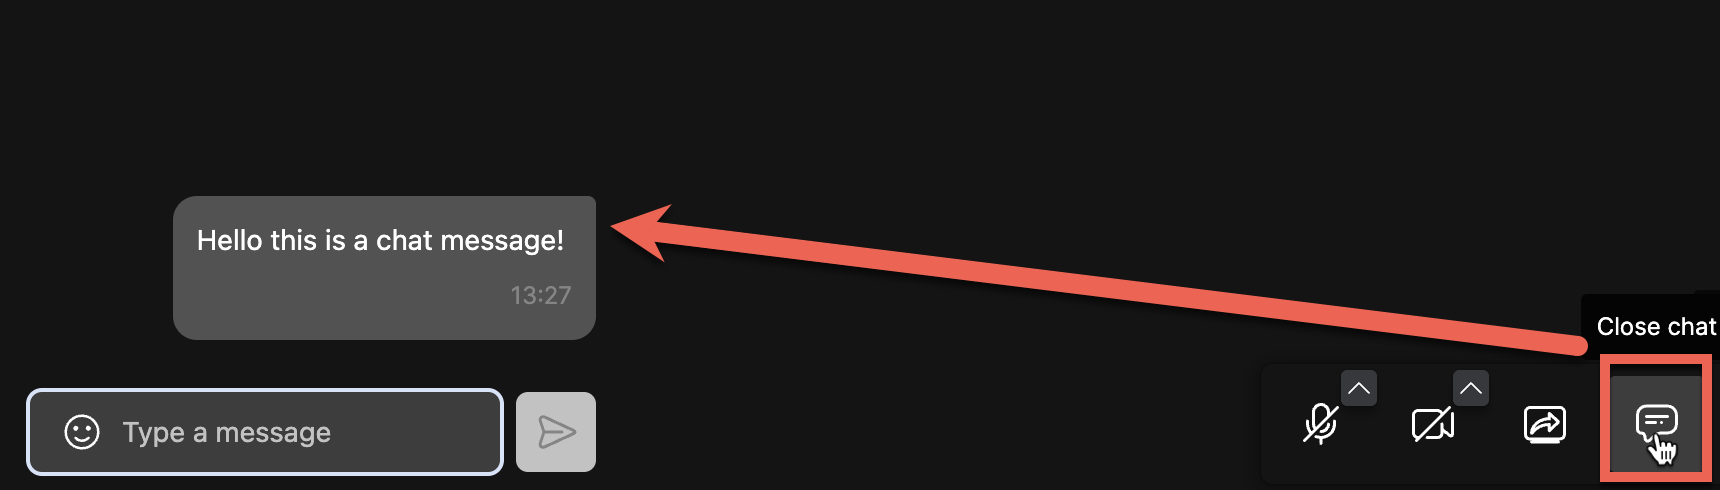
To start a new chat conversation, simply select an existing contact from the ‘Select contact …' menu at the top of the page and type or select the contact(s) you wish to include. Once the contact(s) has been selected, type the message at the bottom of the page to begin the conversation.

Once you select a conversation, you can call the contact directly or initiate a video call by utilizing the appropriate icons found in the top-right-hand corner of the screen.

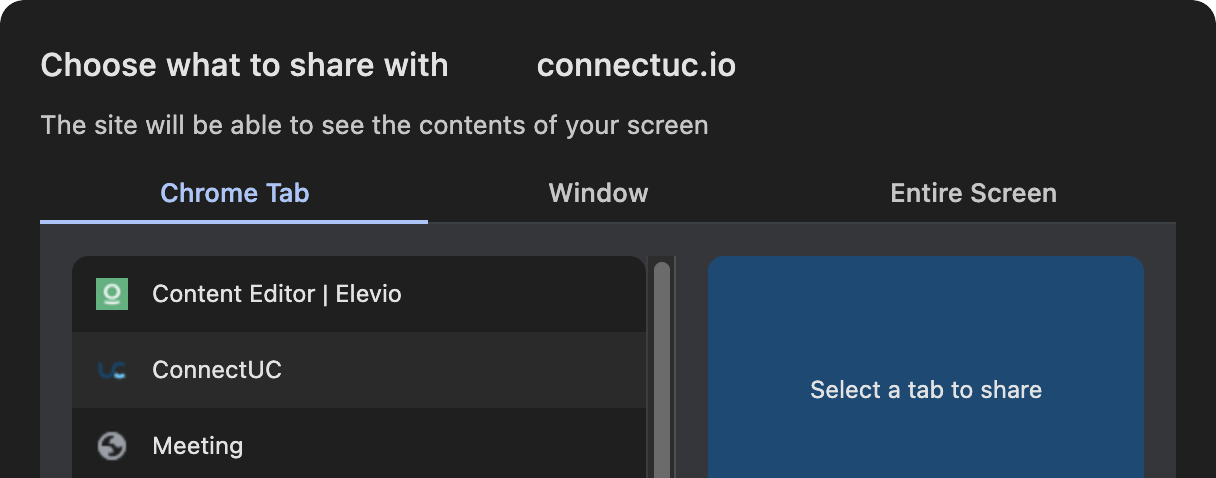
If you initiate a video call, you can control your video, audio, and screen-sharing options via the active video call window that will pop up in a separate window.

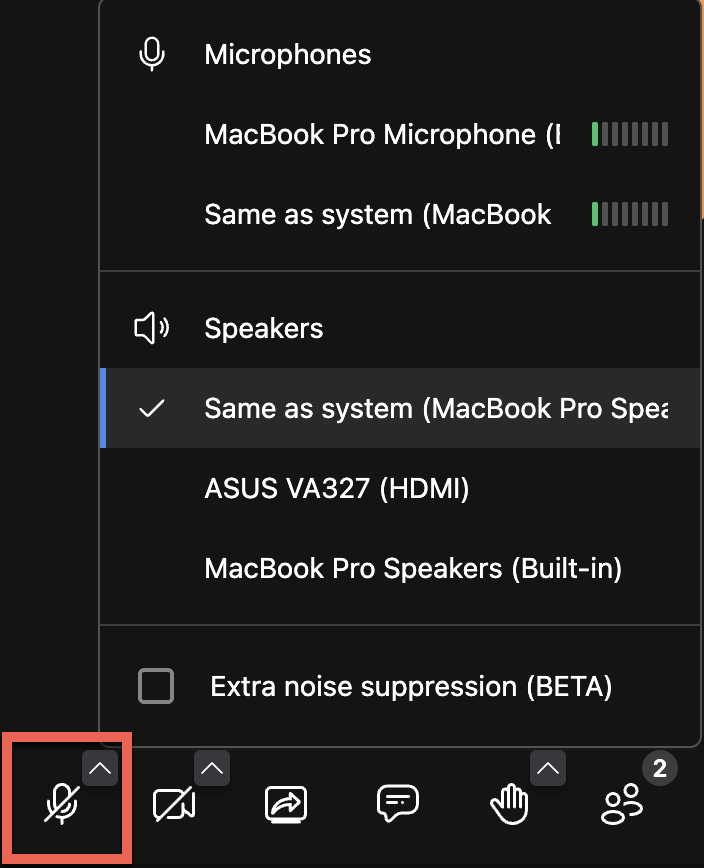
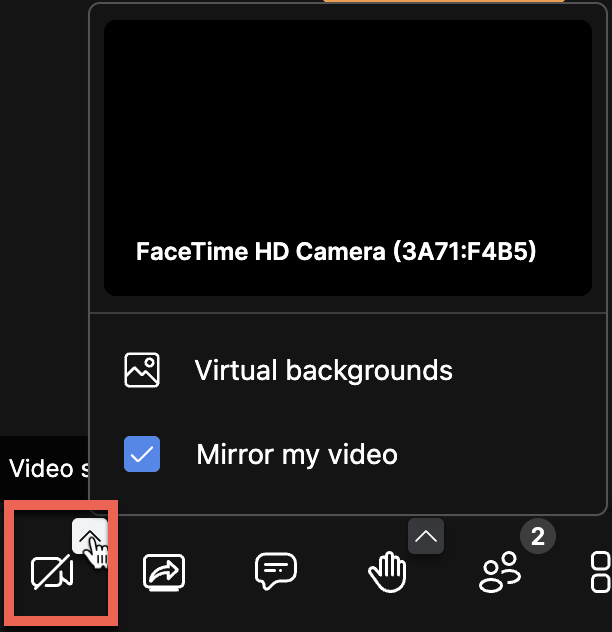
If you close this separate window, you can still manage your call audio/video options via the menu found at the bottom left side of the screen.

SMS
The SMS tab allows you to create, view, and manage SMS conversations.

Selecting an existing SMS conversation from the list on the left-side menu allows you to view the message history and reply with new messages. You may also call the selected number by clicking the 'Phone' icon at the top right-hand side of the page.

A user may confirm their outbound SMS number by looking under the 'My SMS Number' section at the top of the left-side menu or by viewing it when sending an outbound SMS.
Users may include Emojis or file attachments by clicking the appropriate icons to the right of the outbound SMS box.

CONTACTS
The Contacts tab allows you to view, create, and manage all of your ConnectUC contacts.

To add a new contact, click the ‘+’ button to the right of the contacts selection menu, and you will be able to supply all info, including a profile picture and other contact info.

When viewing an individual contact, you can view information such as their availability status, extension, and other contact info. Additionaly, you may call, chat, or video call the contact from the options found on the top right side of the screen. Lastly, you can add contacts to your ‘Favorites’ list by clicking the star icon found to the right of their name.

FAX
The Fax tab allows you to send faxes and also view inbound and outbound faxes.

To send a new fax, click the ‘+’ button to the right of the Fax Caller ID and you will be able to modify cover page options, caller ID, file attachment(s), and the destination number.

DIALER
The dialer option found at the bottom left side of the page allows you to use a dial pad for making outbound calls. Additionally, you can also search and call existing contacts from the dialer menu.

INSTALLING UC DESKTOP APP
Install the UC Desktop app using PWA (Progressive Web App).
Begin by opening your Chrome Browser or Edge Browser and logging in at connectuc.io with your PBX credentials (typically, the username is 'extension@domain' format).
If this option is not available, please instead select your profile icon and then select 'Preferences.'

Once selected, navigate to the 'Integrations' tab and click the 'Install ConnectUC' button to initiate the installation process.

To finalize the installation, please remember to click 'Install' when prompted.

Once the UC Client is installed, you will now have a new Tray icon like any other desktop app (Mac pictured).

To set ConnectUC to Run on Startup:
For Windows: Click the "..." button menu when the app is open and select “Pin to Start.”

For Mac: Right-click on the PWA icon in the dock and select “Open at Login.” We also recommend Mac users select "Keep in Dock" for convenience.

ONE-CLICK CALLING
From a web browser, you can make ConnectUC calls with one click on any web page with a phone number link.
Important: One-click dialing only works on computers with the ConnectUC client installed as a Progressive Web App (PWA).
You can use ConnectUC to make calls from the following browsers:
-Google Chrome
-Microsoft Edge
This article provides the technical details of dealing with the tel:// URL settings in Windows, MacOS and in Chrome and Edge.
If users need to click on numbers on web pages that aren't tel: links can use a browser extension such as this extension from Mondago:
The Simple Method
If ConnectUC isn’t launching properly when you click on a URL handler, the easiest way to get it to work properly is to remove the PWA and clean up any tel:// URL handlers in the browsers. Once complete, you may re-install the ConnectUC PWA and let it register ConnectUC as the PWA handler.
Working with URL Handlers
The tel:// URL handler can be configured in the Computer's Operating System and also in the Web Browsers. For use with ConnectUC it’s best to remove tel handlers from within Chrome and Edge and let the operating system settings control launching ConnectUC.
The operating System configuration is handled differently on Windows vs. MacOS.
POP UPS & NOTIFICATIONS
For the best experience with ConnectUC, please be sure to allow notifications and updates. ConnectUC notifications allow users to know when they are being contacted and partially or fully disabling notifications can prevent users from being notified appropriately.

If you are unsure how to allow notifications for ConnectUC, please visit the following pages for browser-specific instructions.
If you still have trouble with notifications appearing properly, you may need to allow notifications at the Operating System level.

Please reference the following guides for managing notifications at the OS level.
COMPANION MODE
ConnectUC Companion mode is a feature that allows users to use more than one device to make or take calls with another registered device.
Companion Mode can be toggled on and off from the left side Avatar/Profile menu.
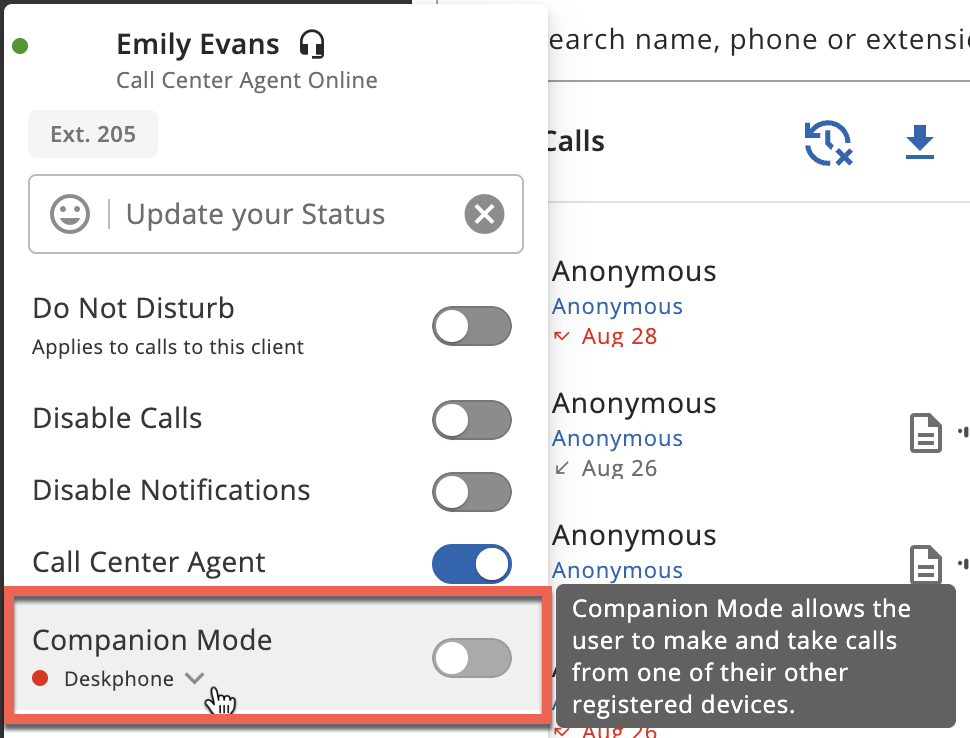
Additionally, you may select which registered device you wish to use to make or take calls from the devices drop-down menu. The currently selected device will be displayed by default.
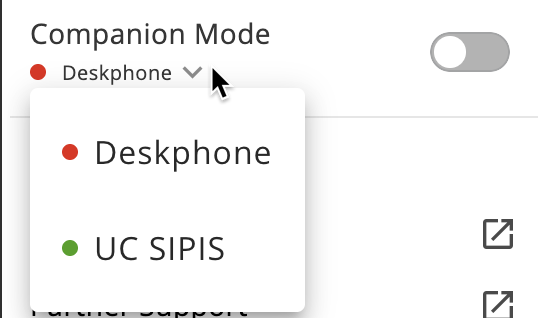
If the device is registered and ready to use, a green dot is indicated next to the device.
If the device is not yet registered and cannot be used with Companion Mode, a red dot is indicated next to the device.
Once Companion Mode is enabled for a registered device, you will see a banner at the top of the page, confirming Companion Mode is active.
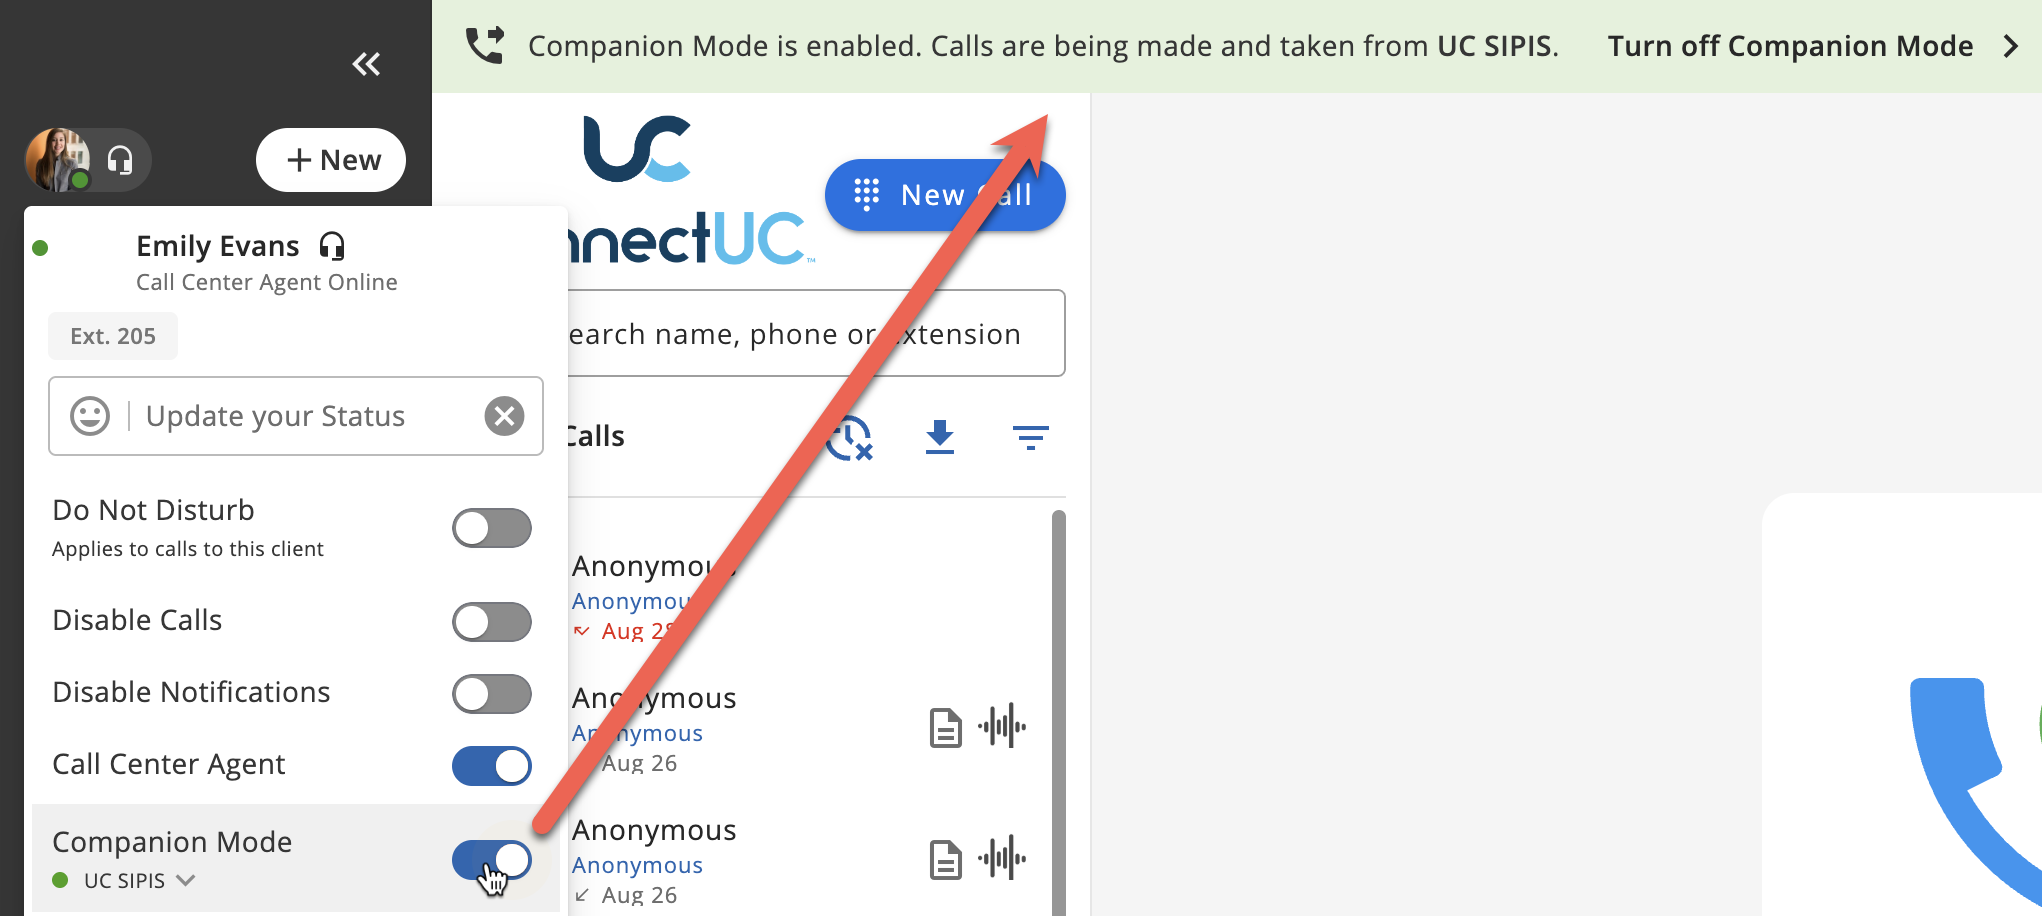
When Companion Mode is active:
If the selected Companion device is answered or dials, the active call window will appear in ConnectUC, allowing the user to interact with the Active Call window to Hold, Transfer, Park or End the call.
DND/Disable Calling functions still impact devices used with Companion Mode.
Additional Companion Mode Settings
Additional settings can be found for Companion Mode by navigating to Preferences > Calling.
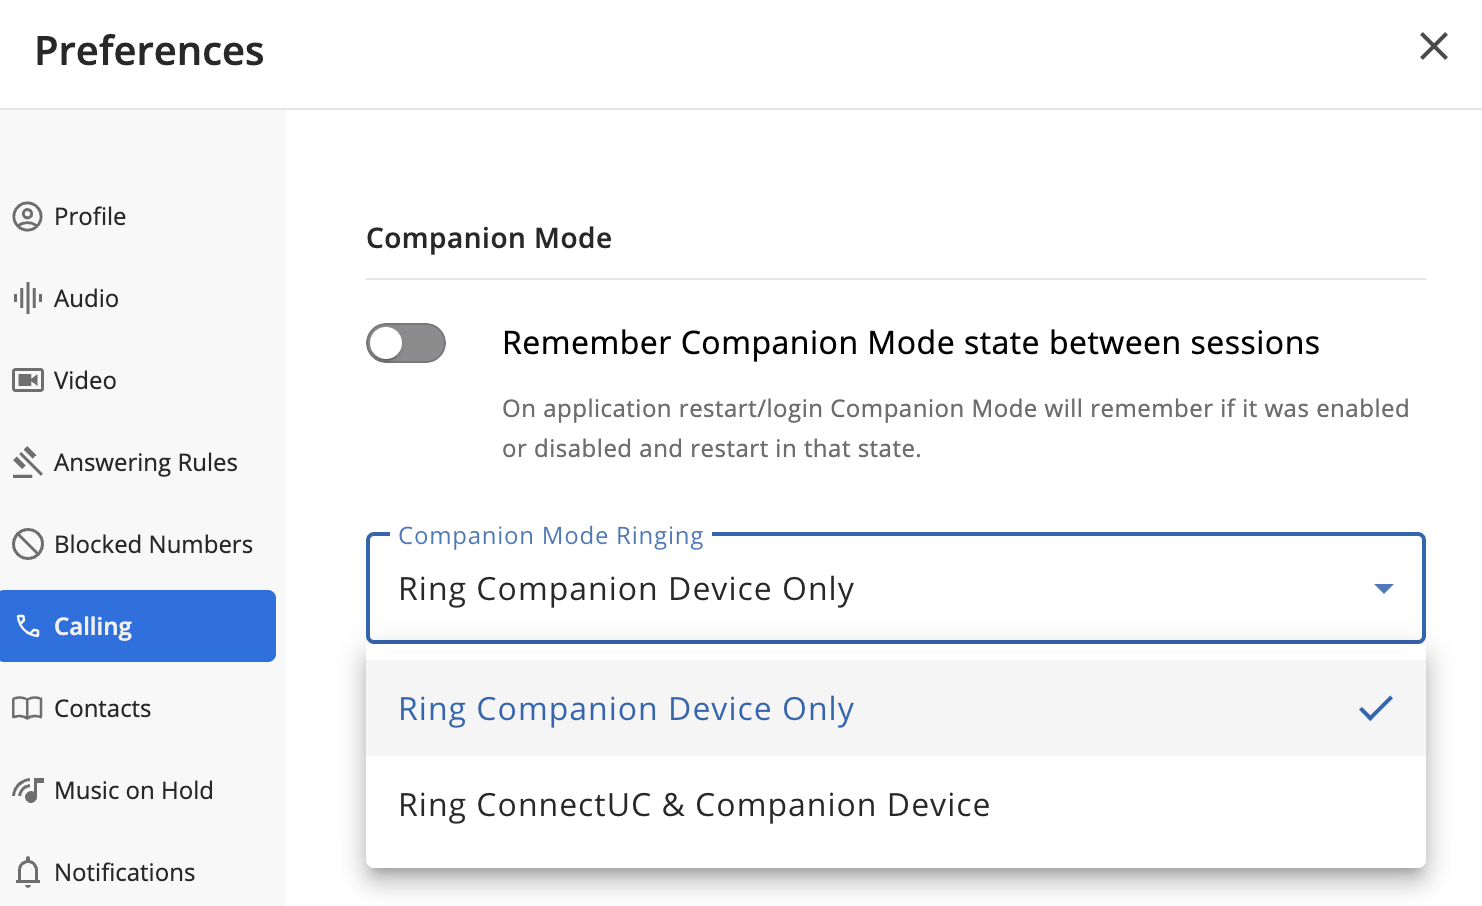
If the 'Remember Companion Mode state between sessions' option is toggled on, ConnectUC will remember if the Companion Mode state was enabled or disabled and will keep the status on restart or login.
The 'Companion Mode Ringing' option allows you to select if only the companion device will ring or if both ConnectUC and the Companion Device will ring.
Note: Companion Mode is not compatible with ConnectUC's Call Recording Announcement feature.
Note: Poly and Yealink phones are known to work with this feature, and your mileage may vary when using the feature with other devices.
VIDEO MEETINGS
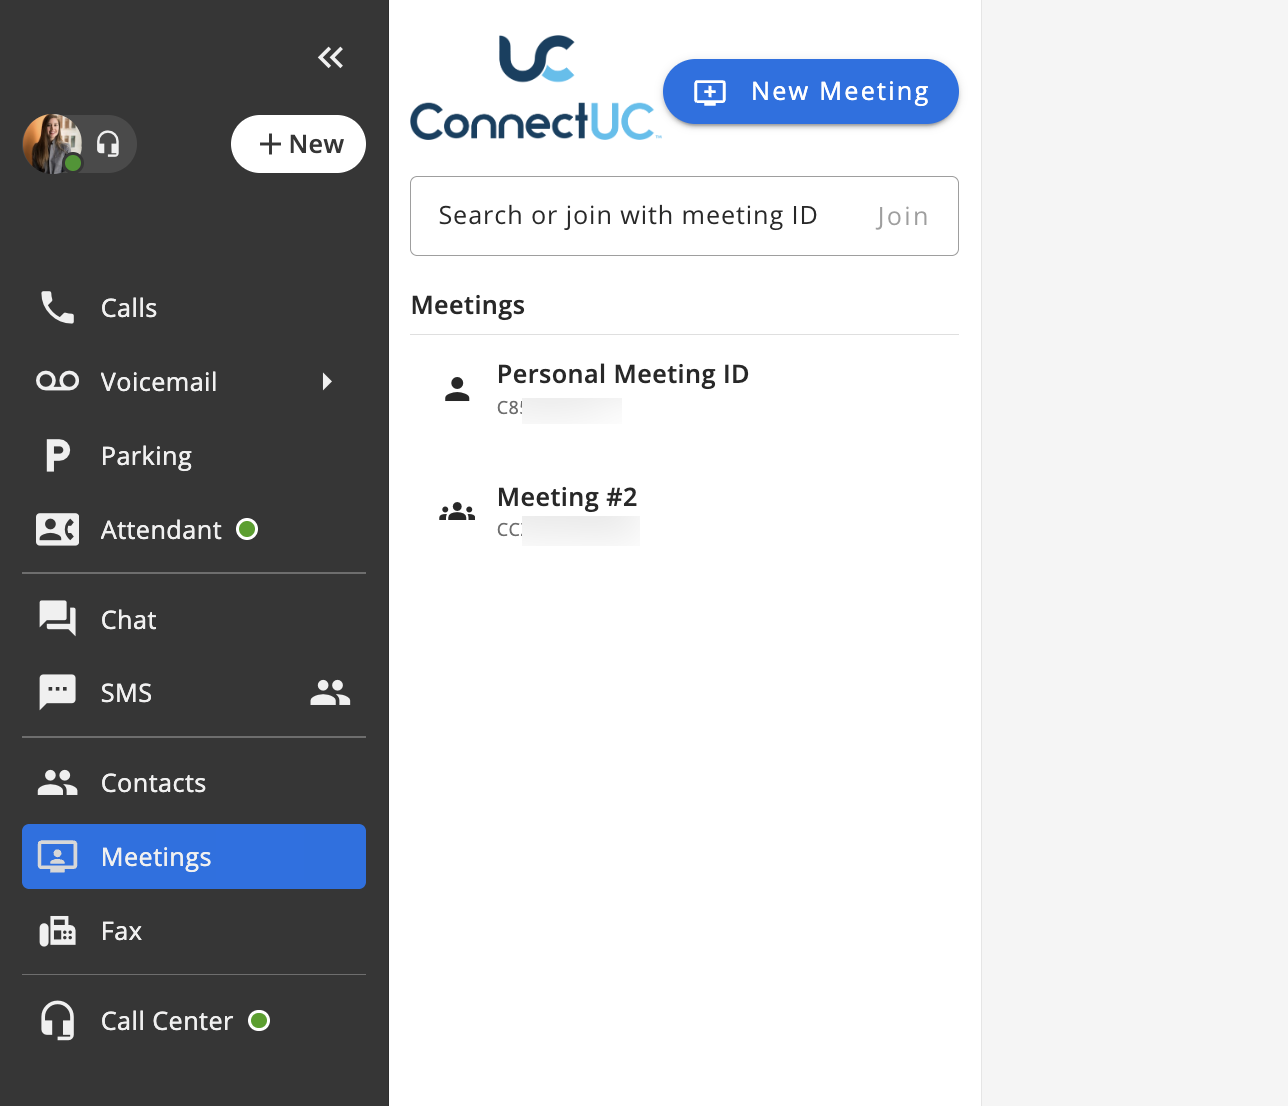
The ConnectUC Meetings tab allows you to view, join, create, and manage meetings within ConnectUC.
By default, each user has a Personal Meeting ID that can serve as a "personal meeting room" that can be used at any time.
The Meetings section also includes a search bar at the top where you can either search the name of the meeting or simply input the meeting ID and join.
Additionally, if the user is invited to a meeting, or if a "shared meeting" is created that is visible to all company users, the meeting details will appear under the 'Meetings' section, as seen below.
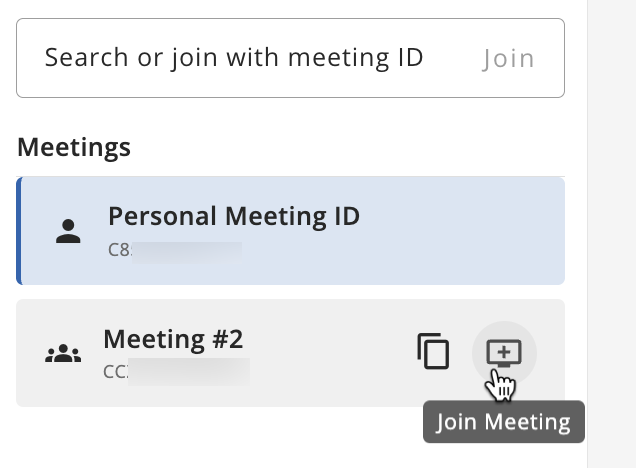
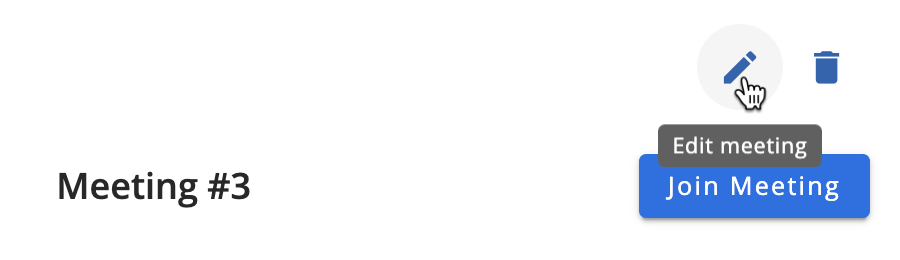
Each meeting entry in the left-side bar includes the following options:
Copy Meeting ID
Join Meeting
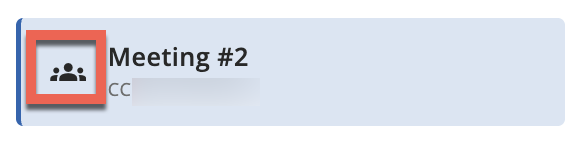
Note: "Shared Meetings" are viewable by all users within your organization, and they can be identified via the 'group' icon, as seen below.
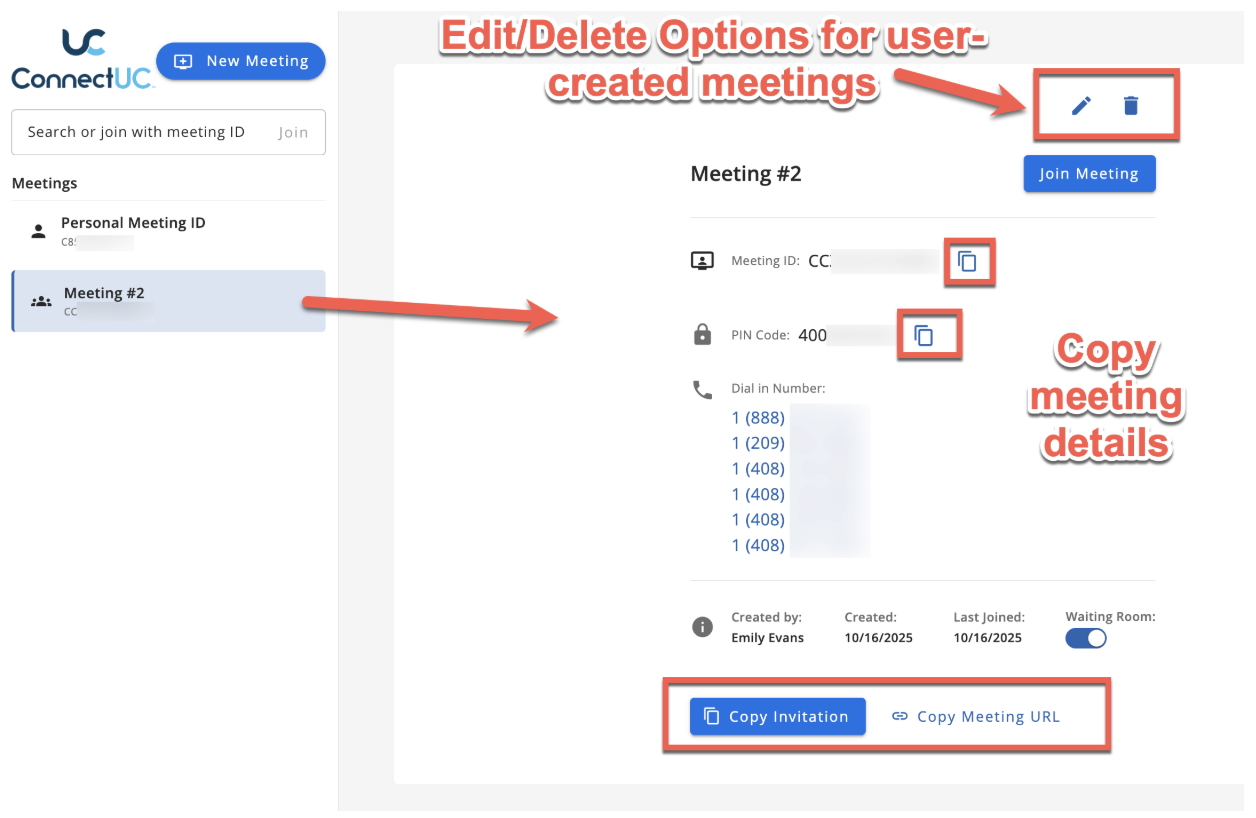
Once a meeting is selected, you can view additional details on the right side of the page, including:
Edit or Delete the meeting (If the user has permission)
Join Meeting
Copy buttons for Meeting ID and PIN Code
List of Dial in numbers for the meeting (clickable)
Name of the user that created the meeting
Date the meeting was created
Date the user last joined this meeting
Toggle if Waiting room is available (If the user has permission)
Copy buttons for Invitation and Meeting URL
Creating a Meeting
To begin creating a new meeting, click the 'New Meeting' button located at the top left corner while viewing the Meetings tab.

Once "New Meeting" is selected, you can configure the following:
Name of the Meeting (Viewable by users that can see the meeting)
Add Meeting Moderators (Optional)
Waiting Room Toggle
Shared Meeting Toggle
On - Allows other users within the organization to view and join the meeting.
Off - The meeting will not appear to other users in the organization and they must be invited to join the meeting.
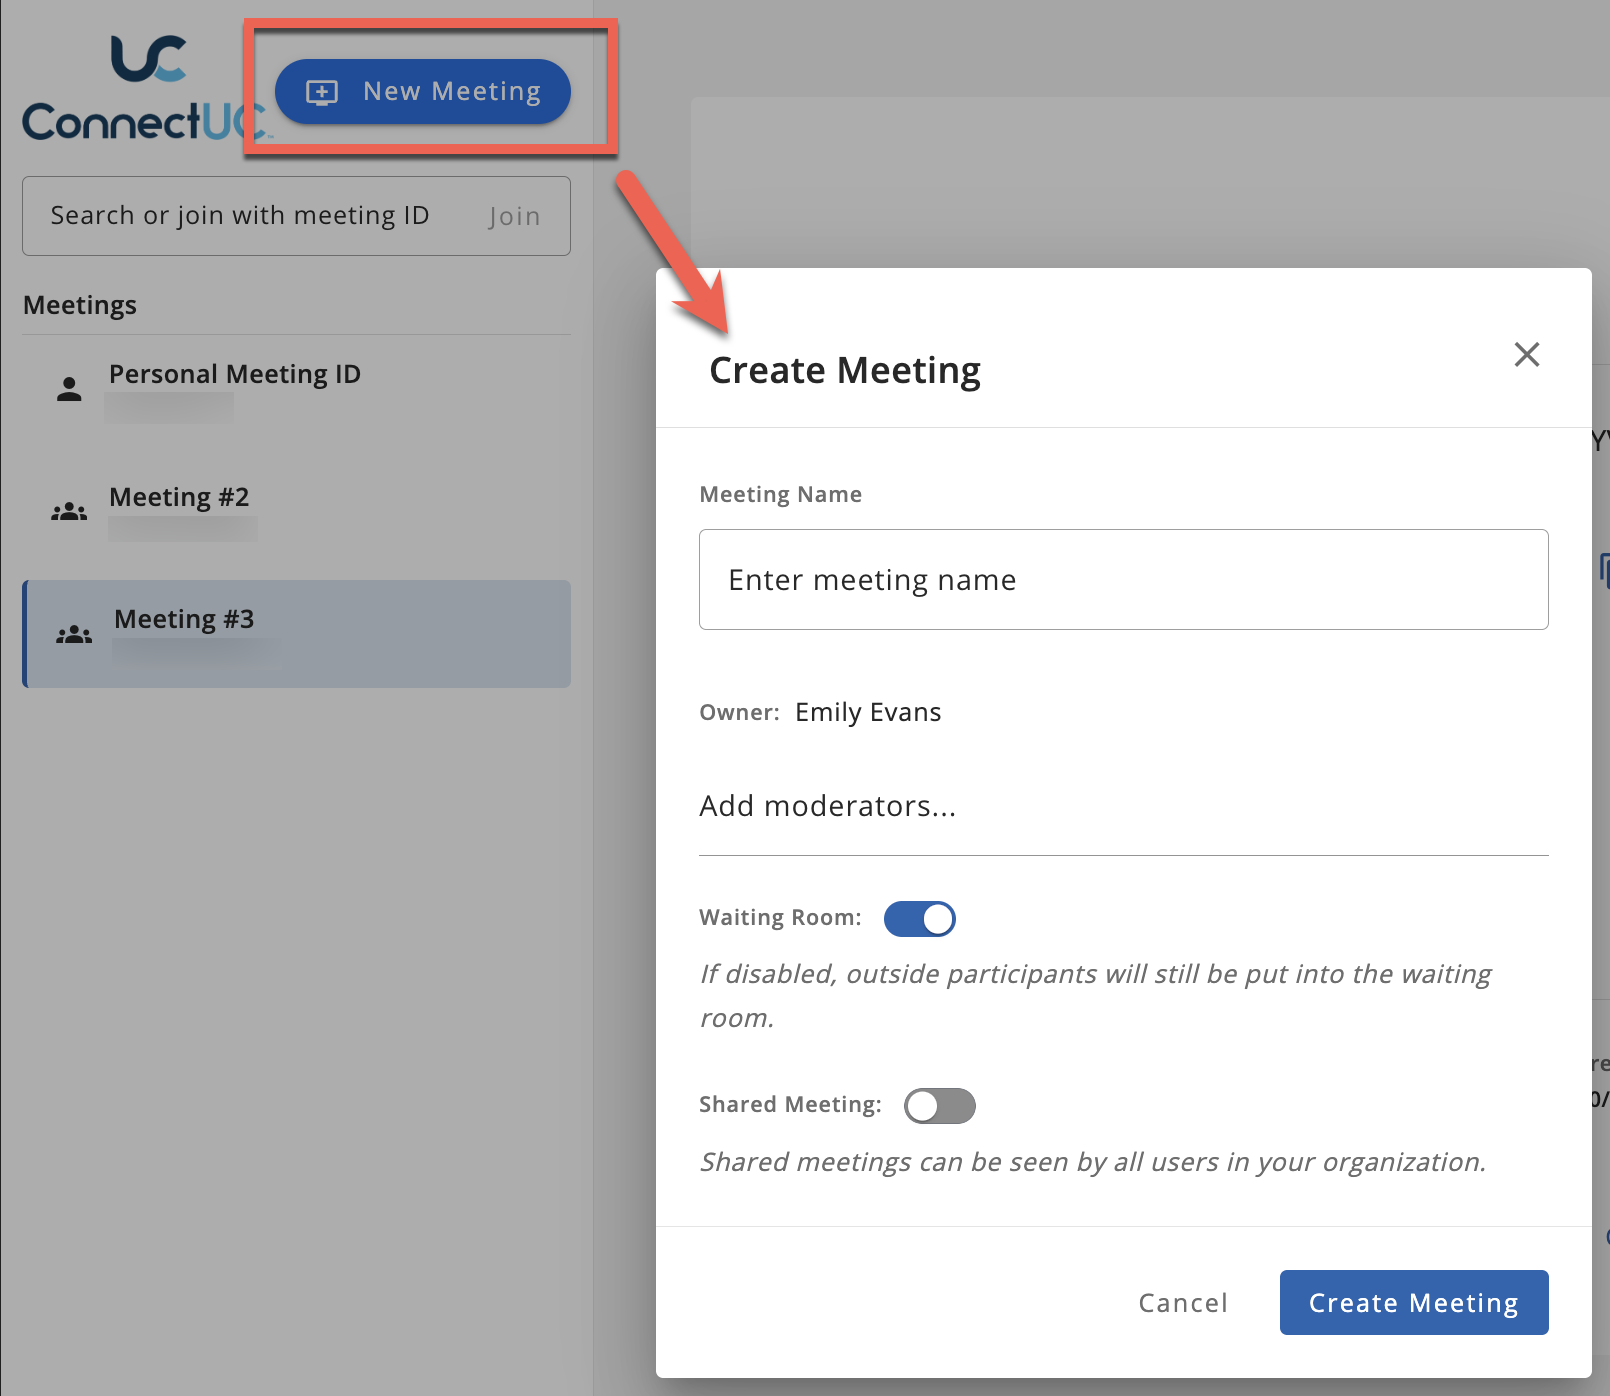
After you have created a meeting, or if you are a moderator for an existing meeting, you can change the details mentioned above by clicking the 'Edit meeting' button.
In Meeting Controls
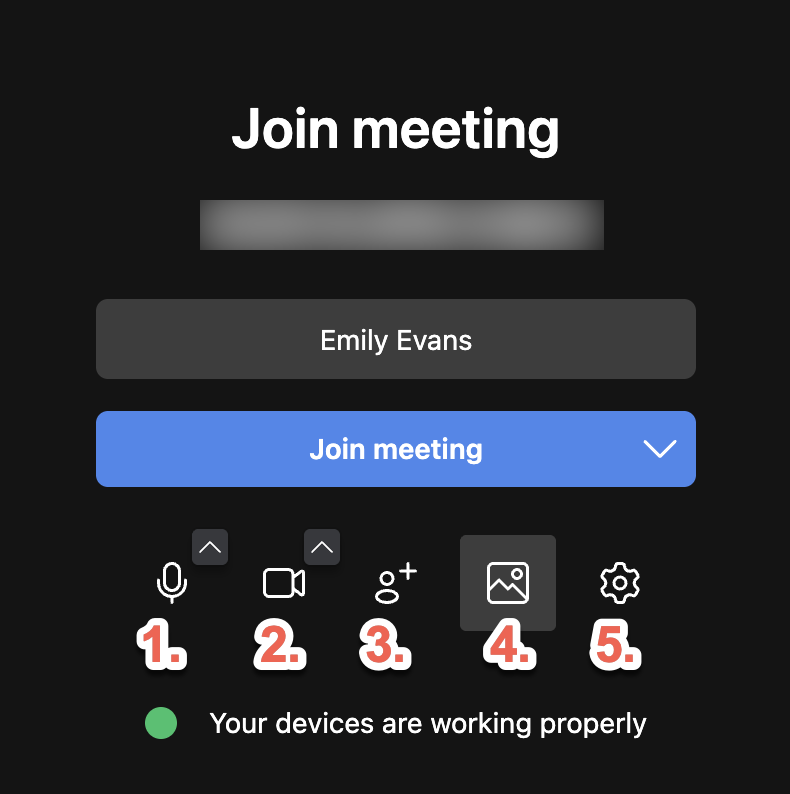
Upon selecting the 'Join Meeting' button, users are presented with configuration options before joining the meeting:
Configure/Toggle Microphone settings
Configure/Toggle Video settings
Invite Users to the meeting
Select background/blur settings
Configure All Settings
All the settings presented can also be configured while on an active meeting.
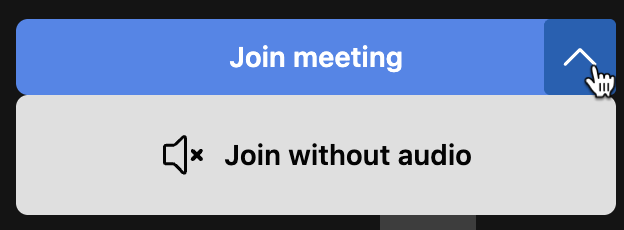
Note: To join a meeting with audio disabled, users can conveniently select the arrow option next to the 'Join Meeting' button and select 'Join without audio'
When the 'All Settings' option is selected, users can manage any setting type by selecting the appropriate tab.
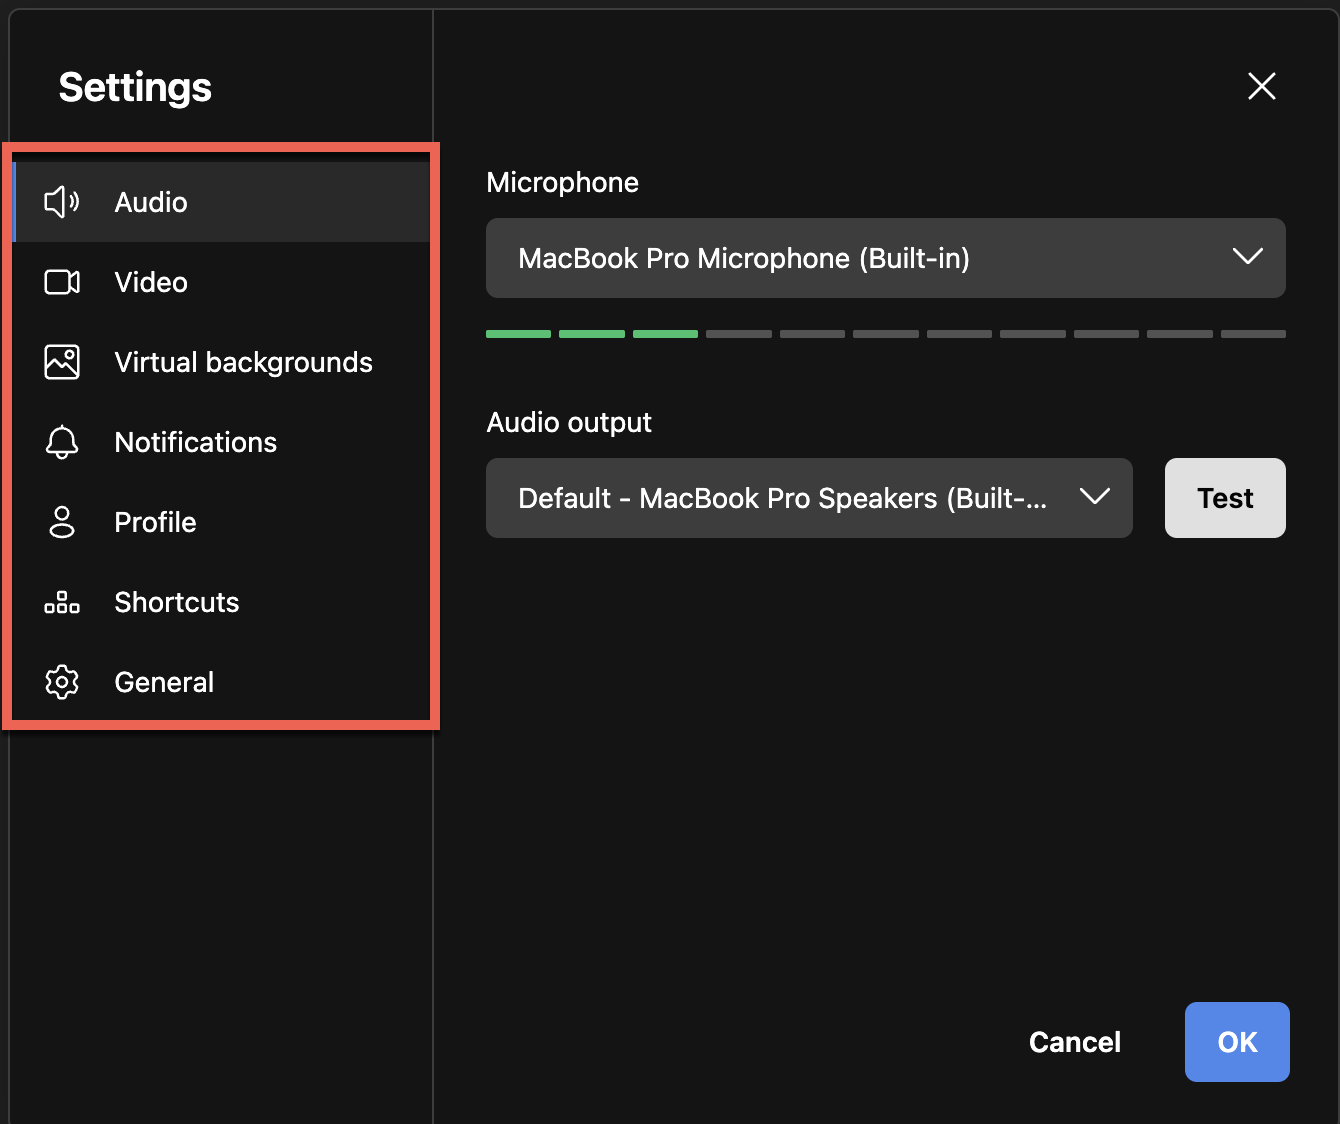
Audio Settings allow the user to configure the microphone and Audio output.
Video Settings allow the user to configure camera settings.
Virtual Backgrounds allow the user to select various background images or background blur effects while showing video during a meeting.
Notification Settings allow users to toggle notifications for meeting reactions, incoming messages, participant joined, participant left, talk while muted, participant entered lobby, and chat messages.
Profile Settings allow the user to change their Display name and Email.
Shortcut Settings allow the user to toggle Keyboard shortcuts.
General Settings allow the user to set the max number of participants who can be pinned to the main stage, toggle hide self view, toggle show subtitles on stage, and select language.
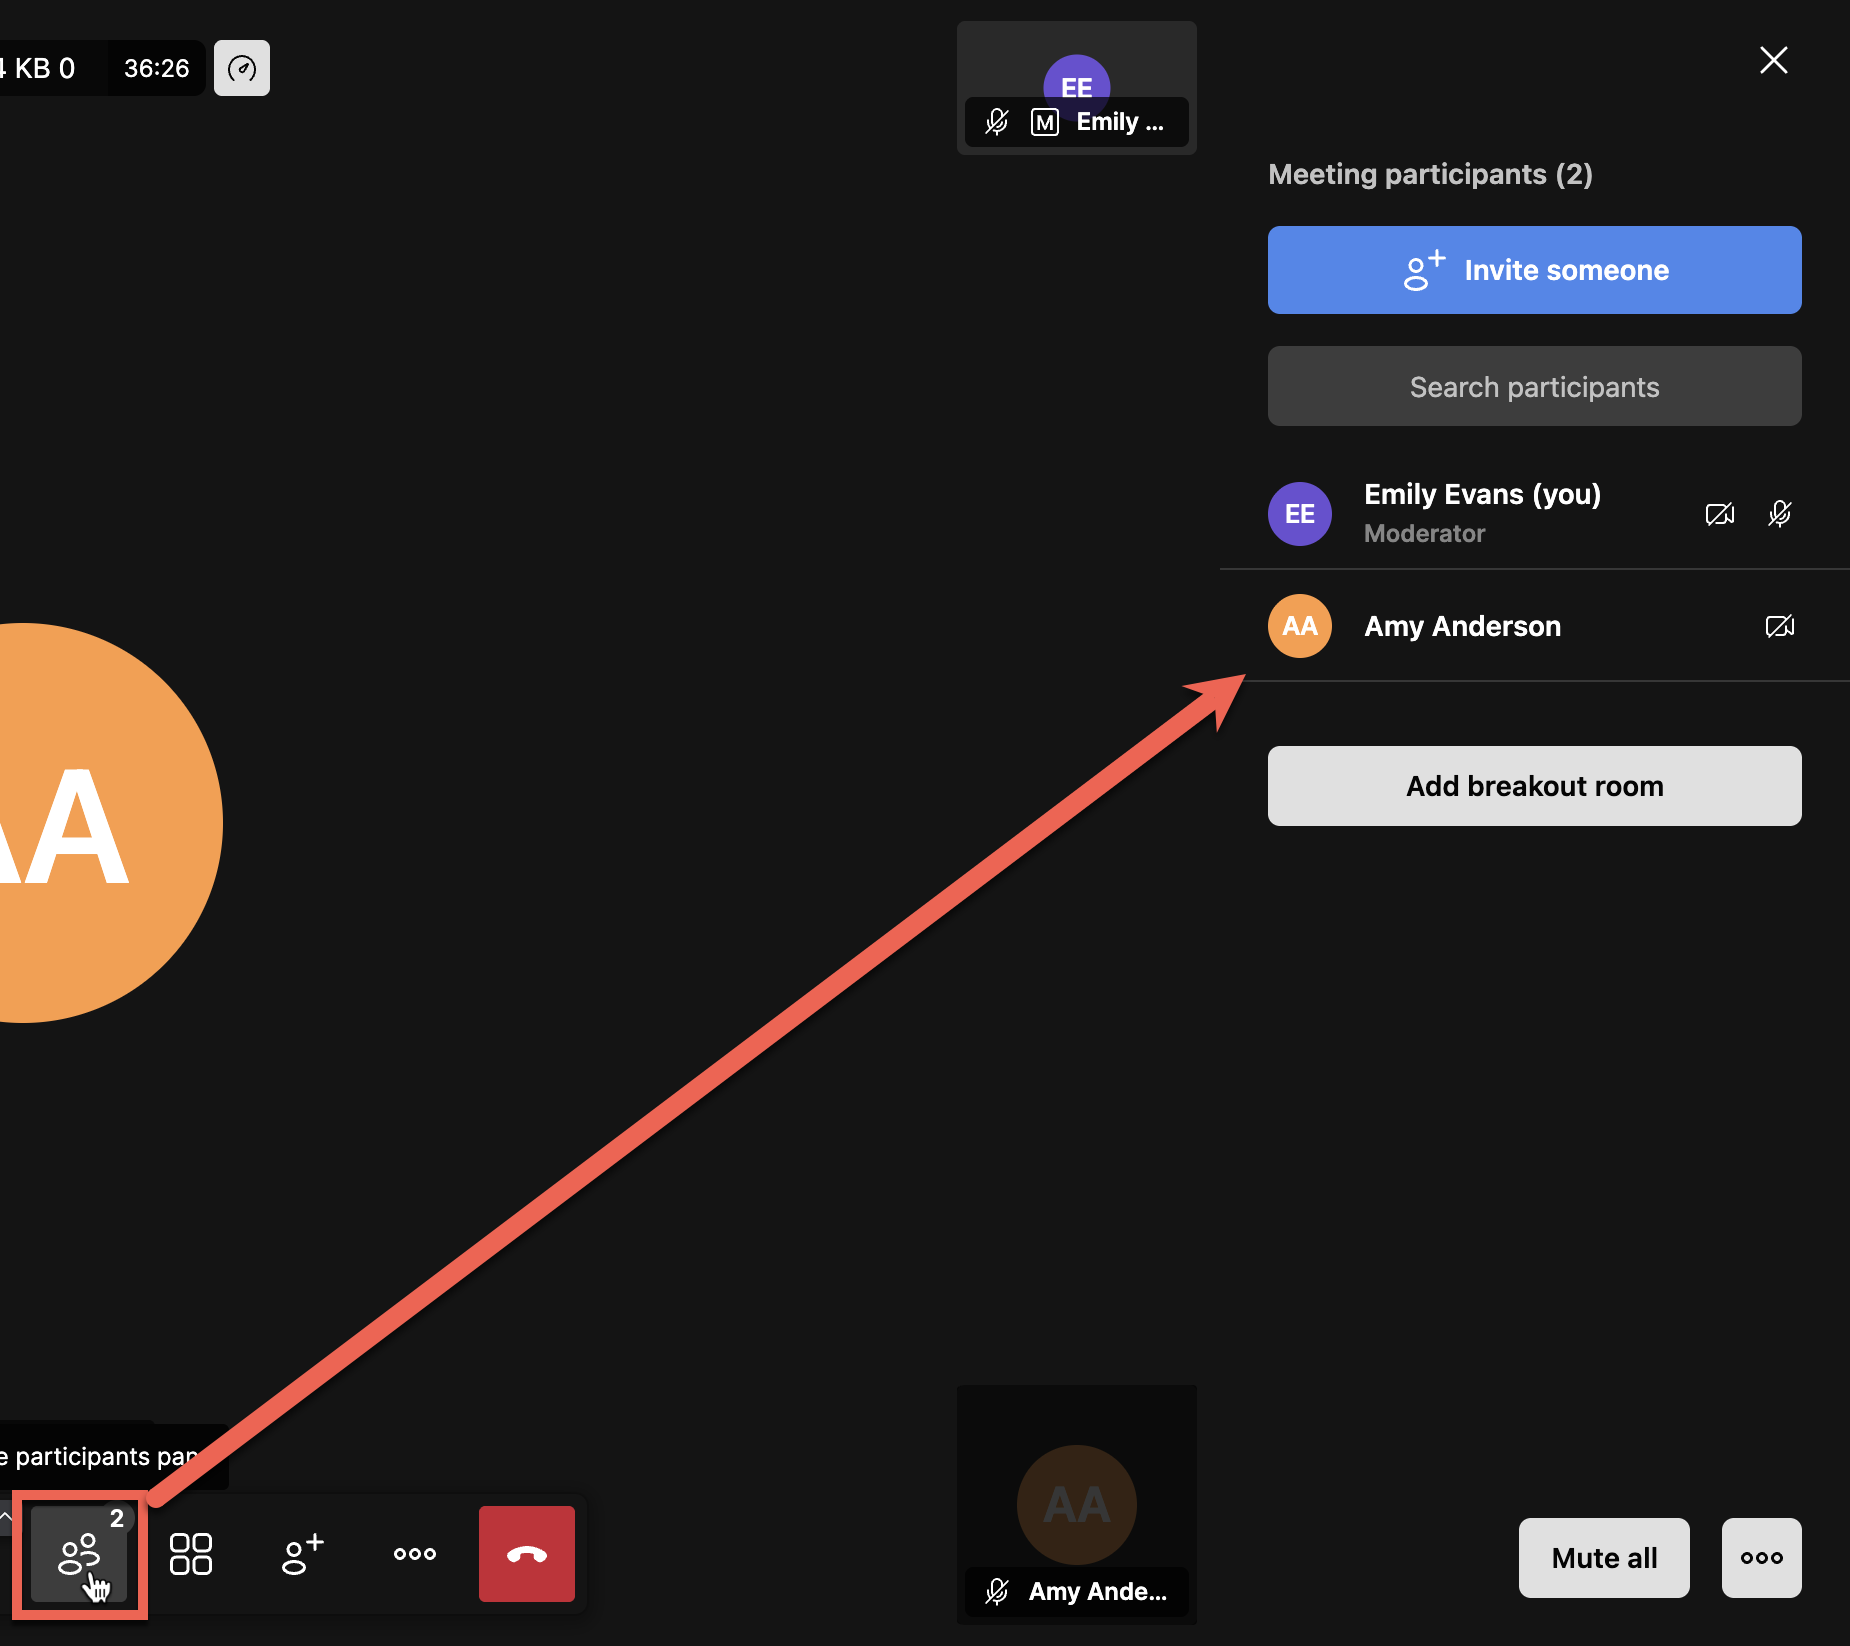
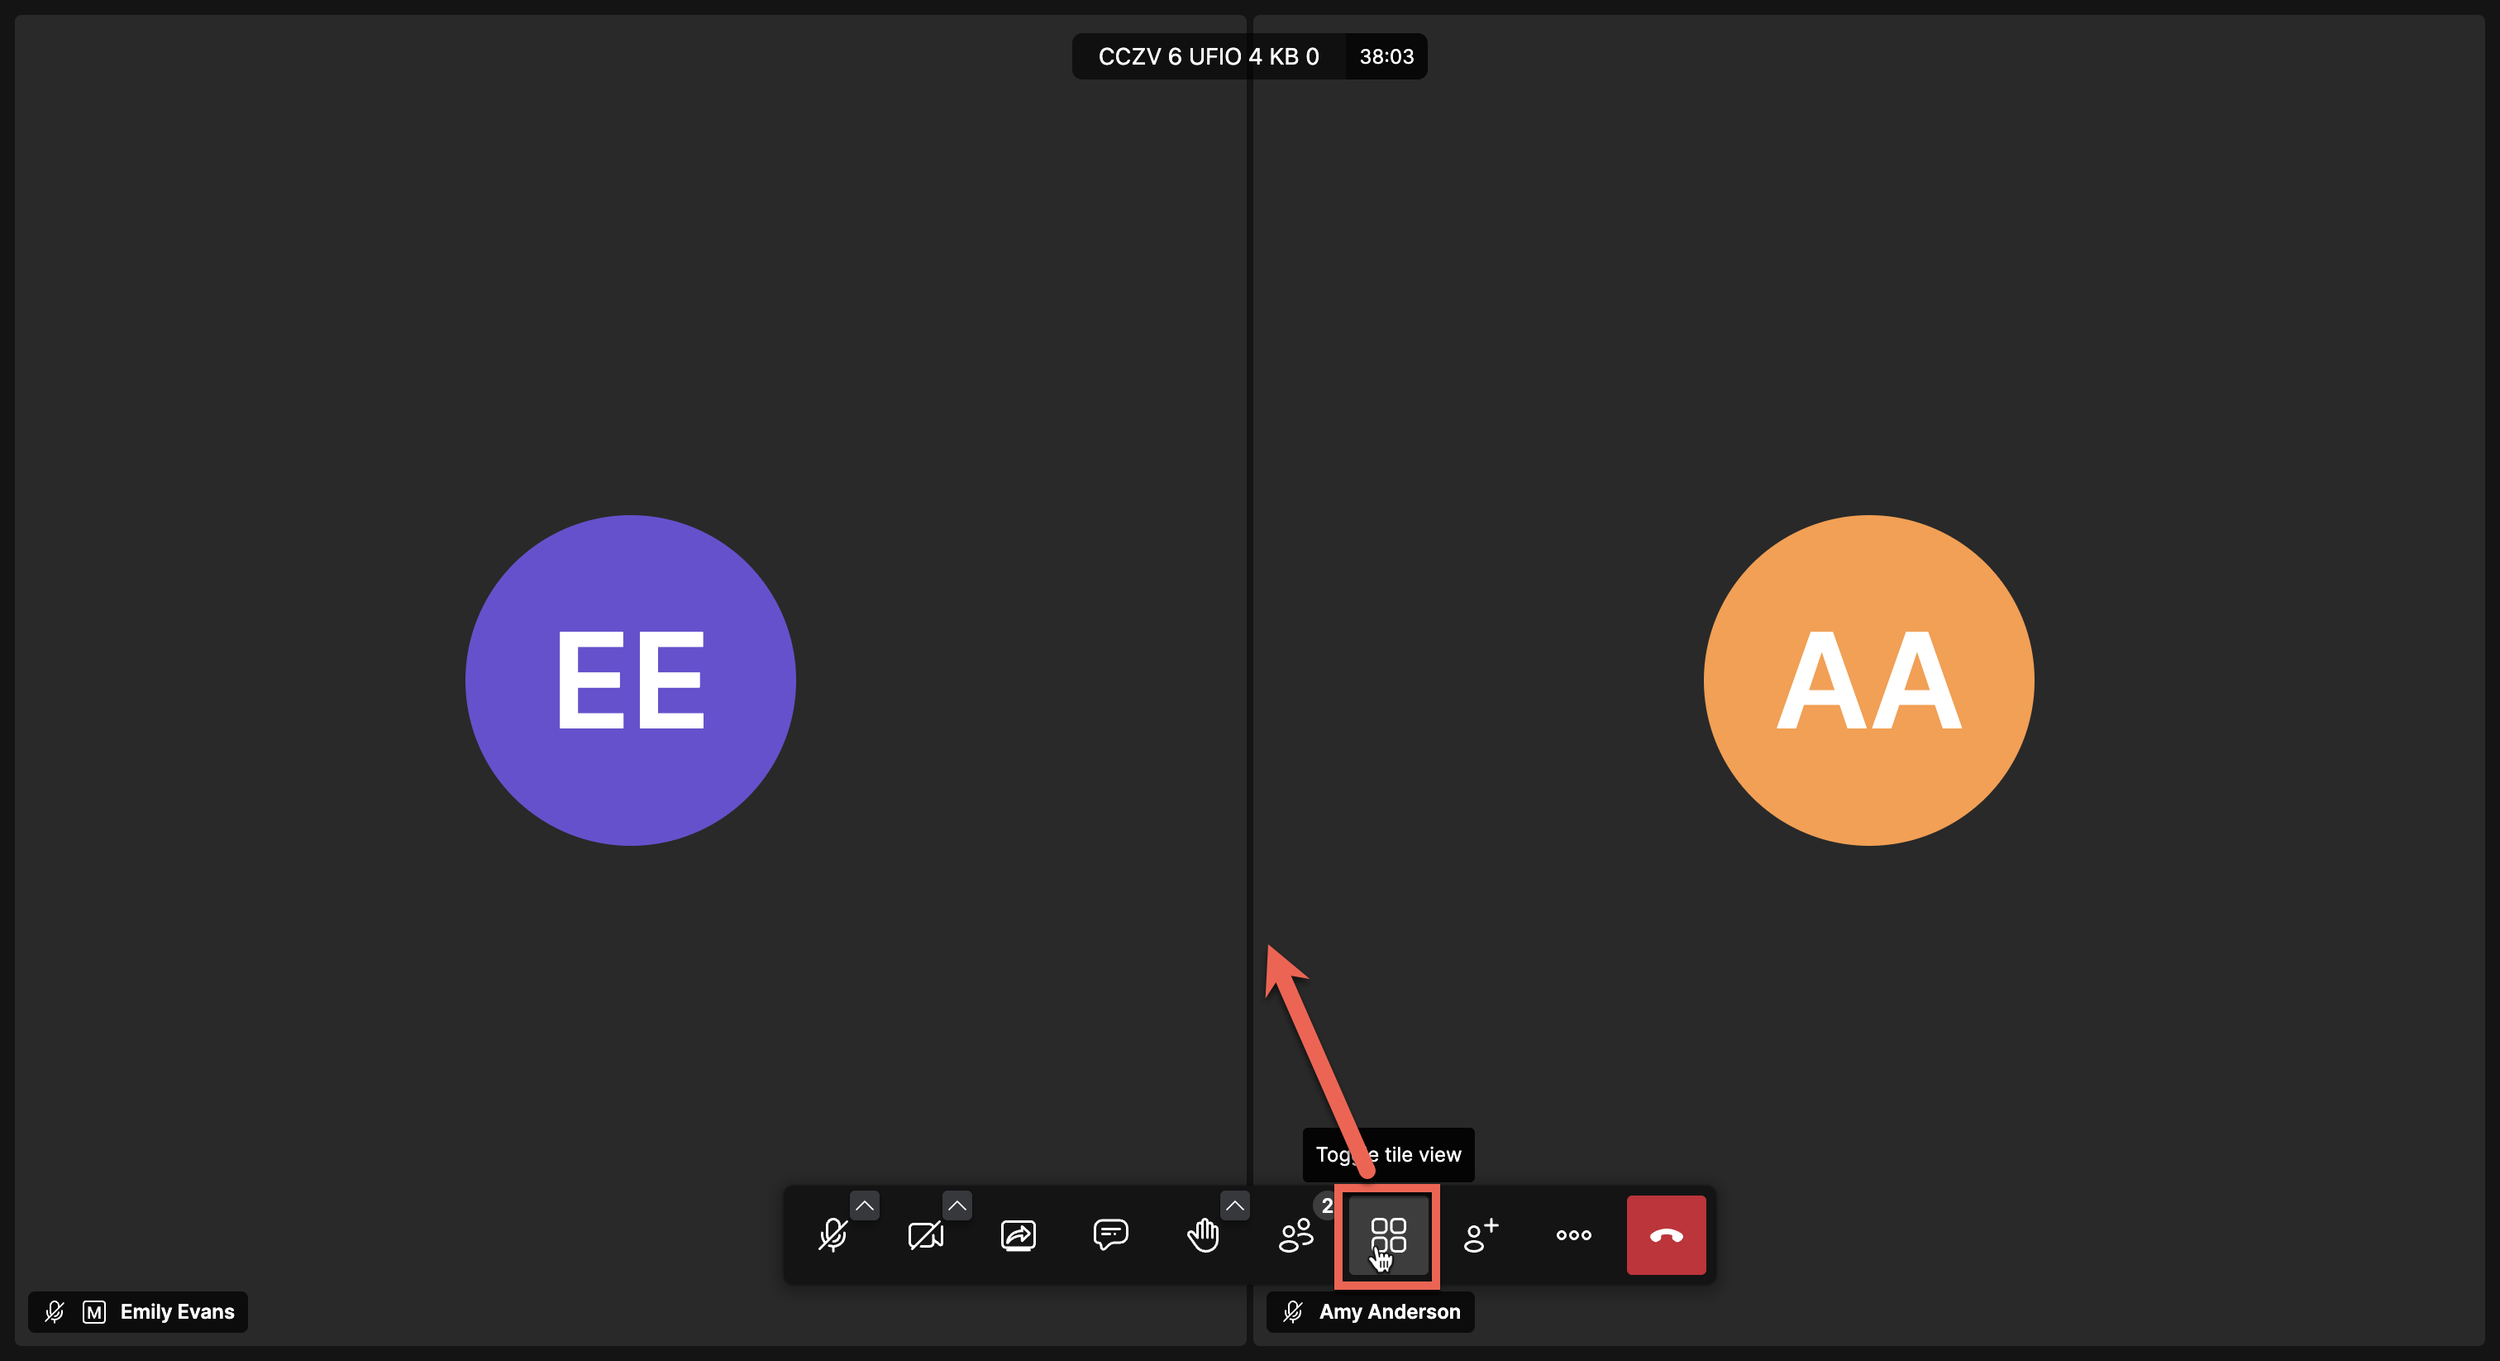
Once you have joined an active meeting, you will be able to view the participants in the right-side panel and you will see configuration options in the bottom menu, as seen below.
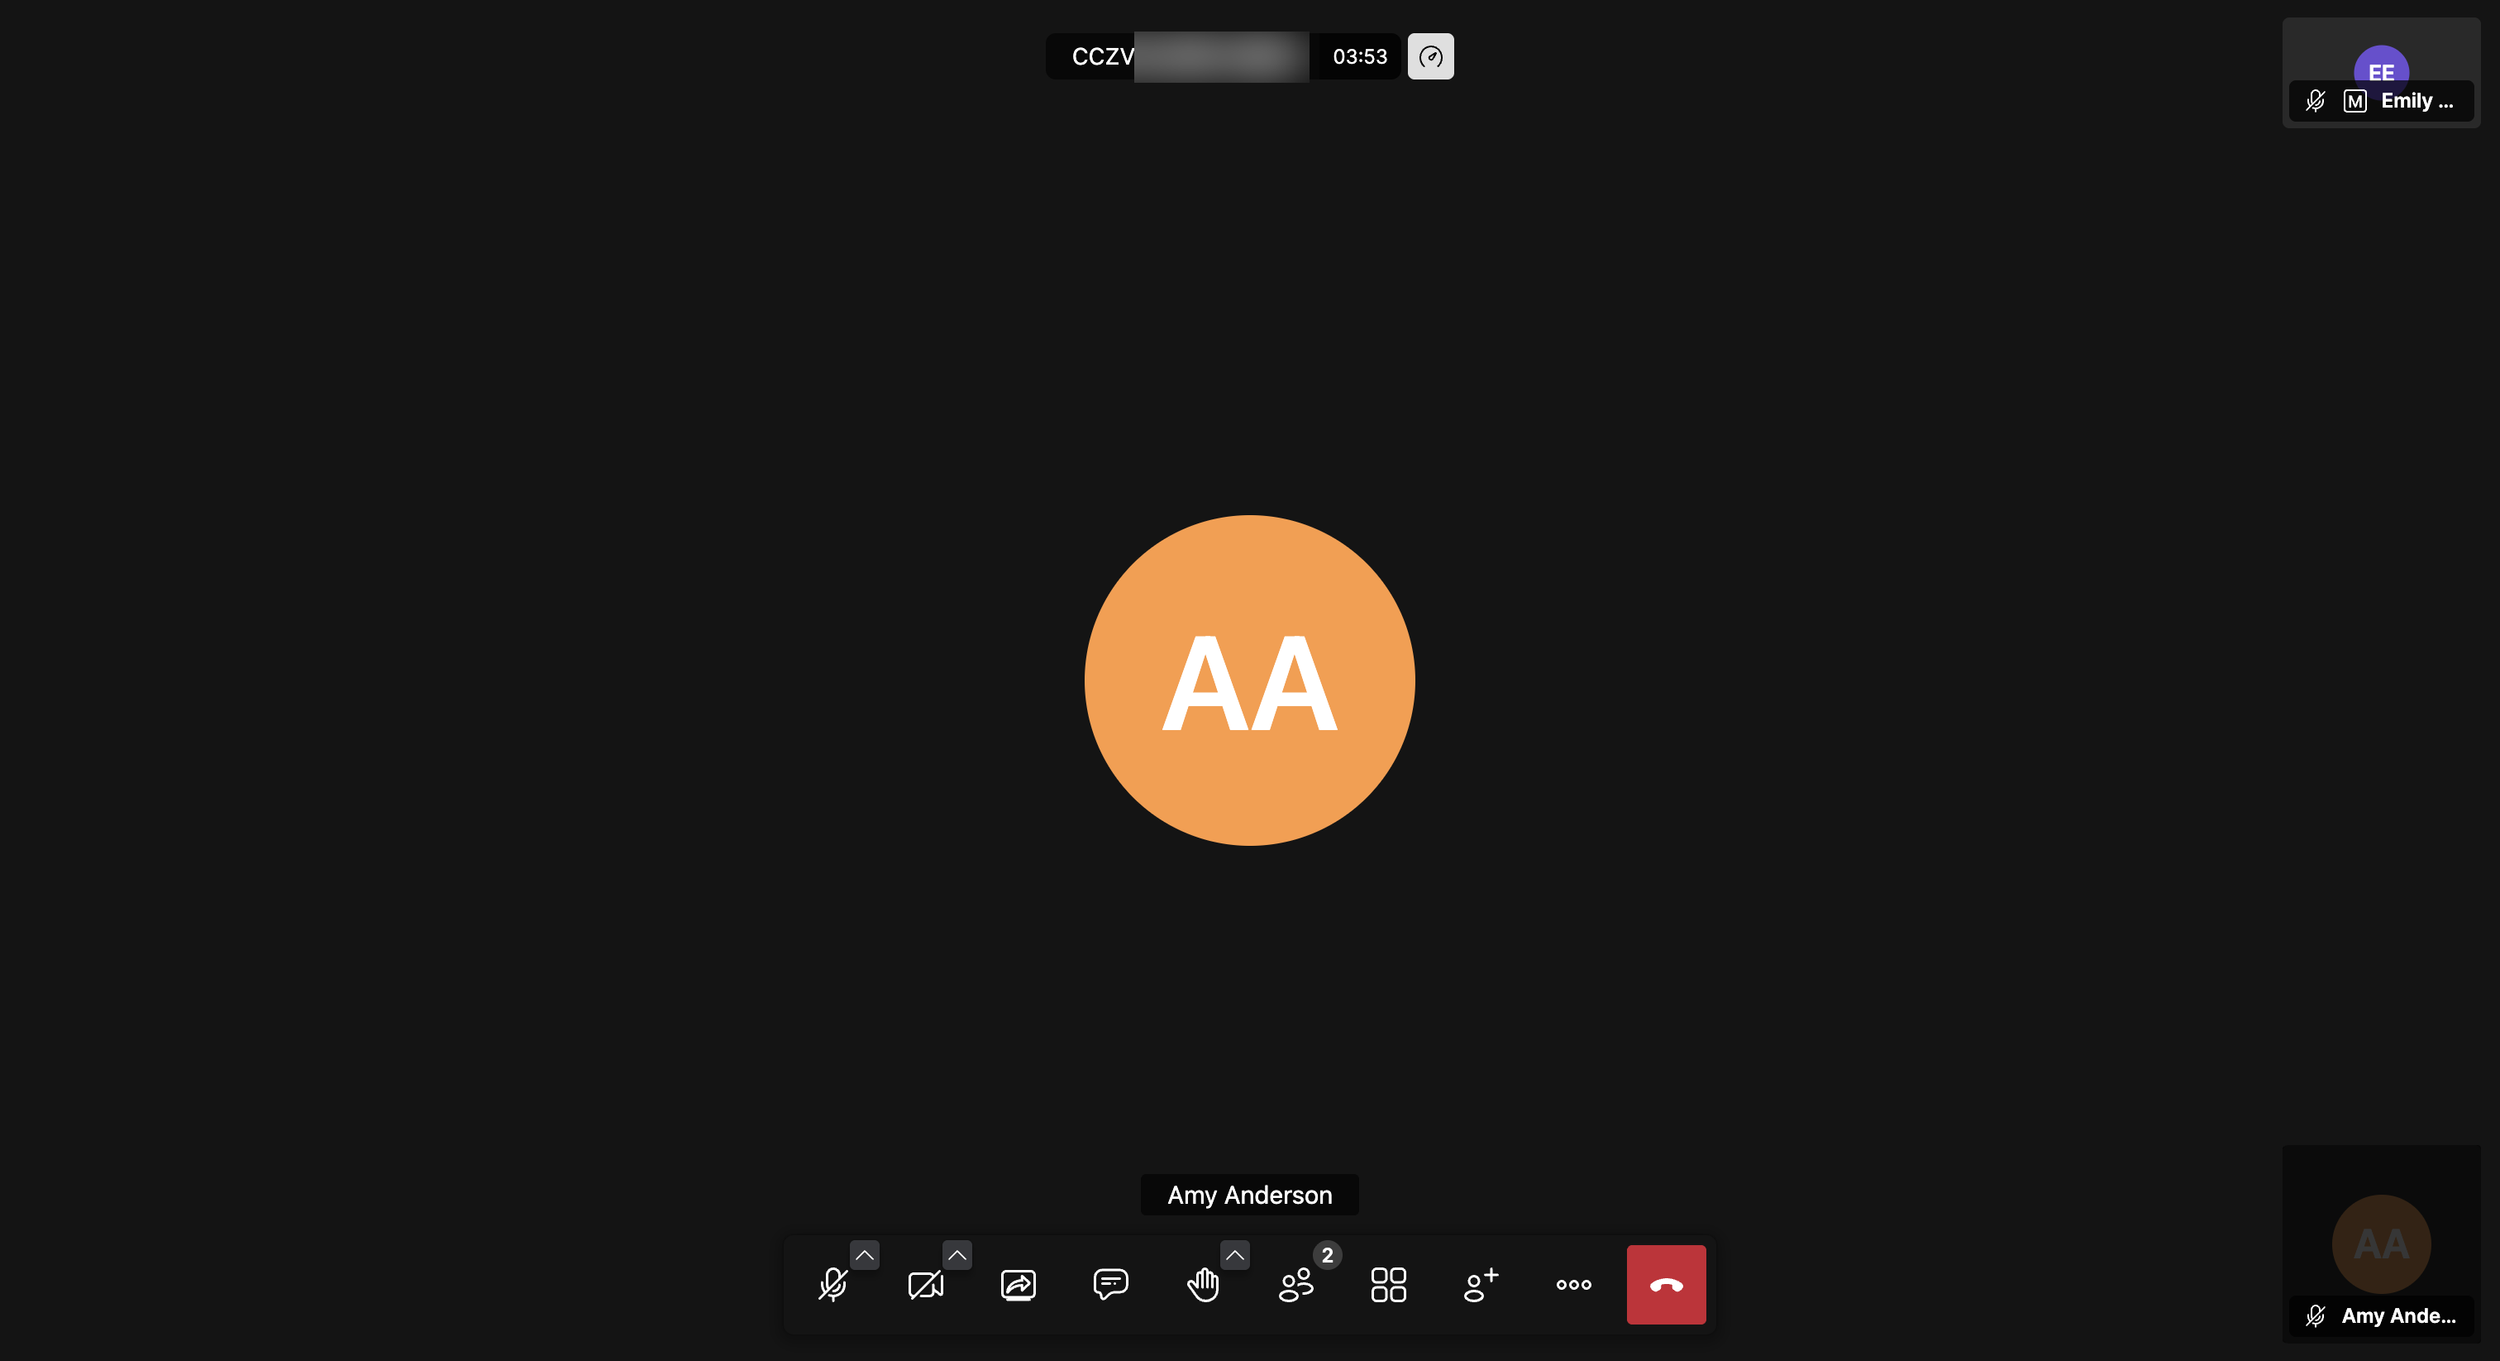
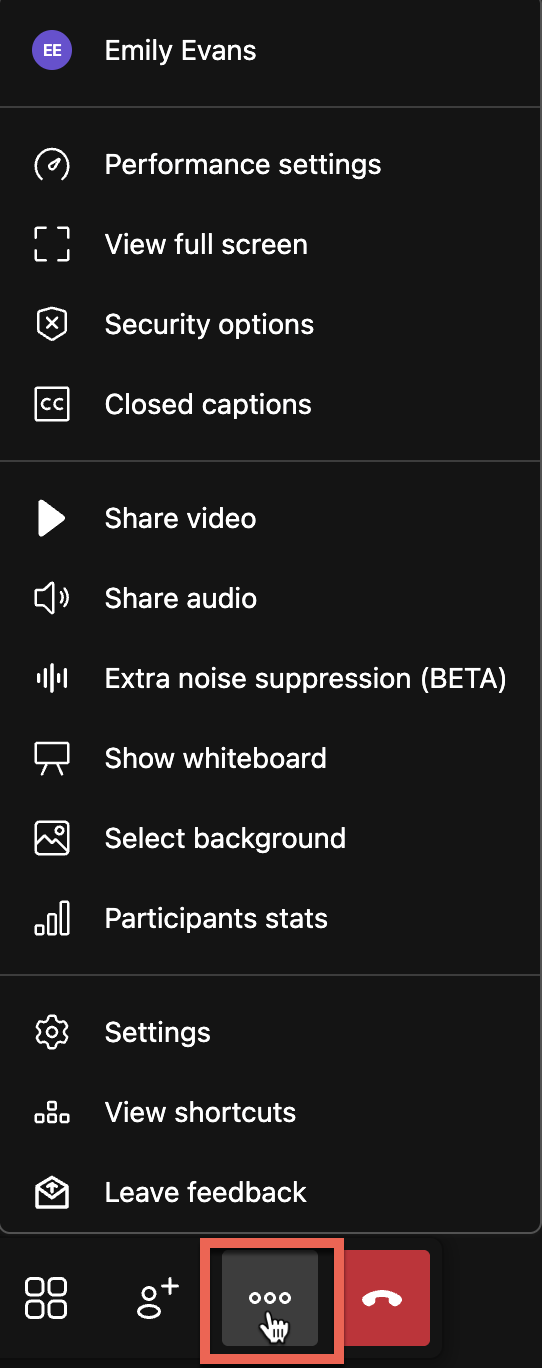
Many of the in-meeting controls are found in the menu bar at the bottom of the screen, however, some options can be configured elsewhere.
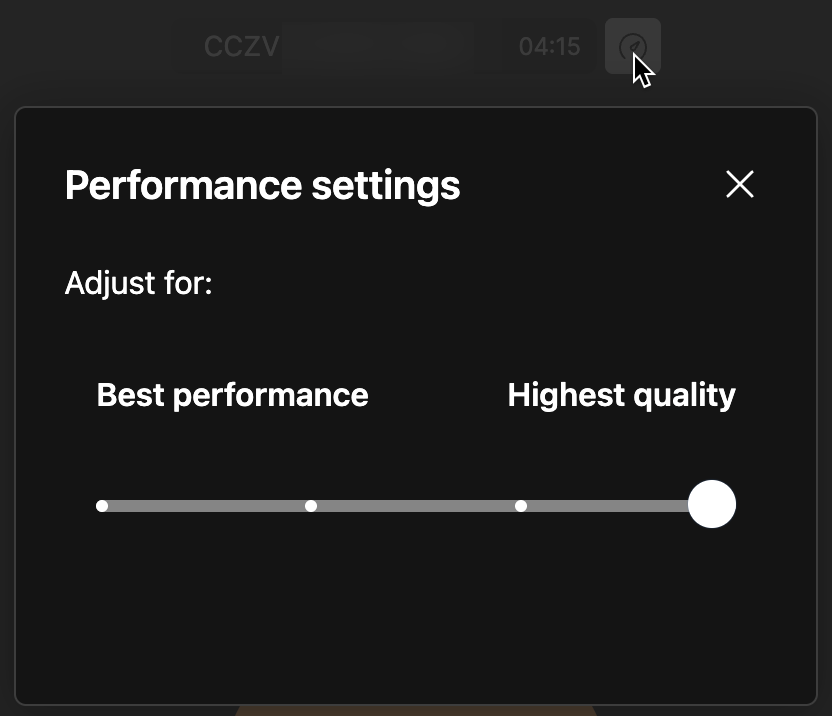
Performance settings can be configured by clicking the 'Performance' icon at the top of the meeting. These settings allow you to customize performance over quality via a slider.
The in-meeting bottom menu bar includes many of the options available just before joining a meeting, however, that are some features only available during a meeting.
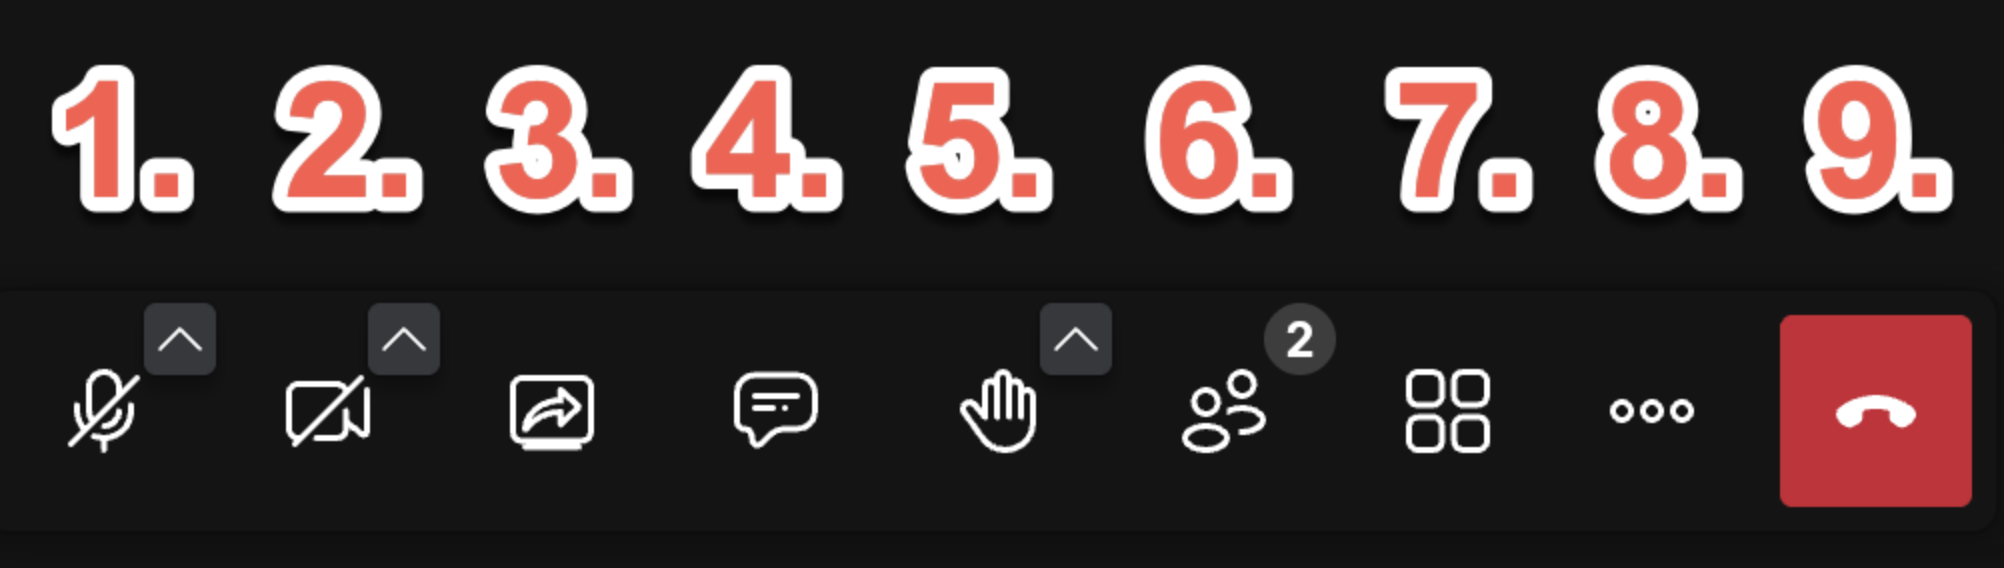
The in-meeting Menu Bar includes the following options:
1) Audio Settings/Toggle Microphone
2) Video Settings/Toggle Camera
3) Start Screen Share
4) Toggle Chat View
5) Raise Hand/Reactions
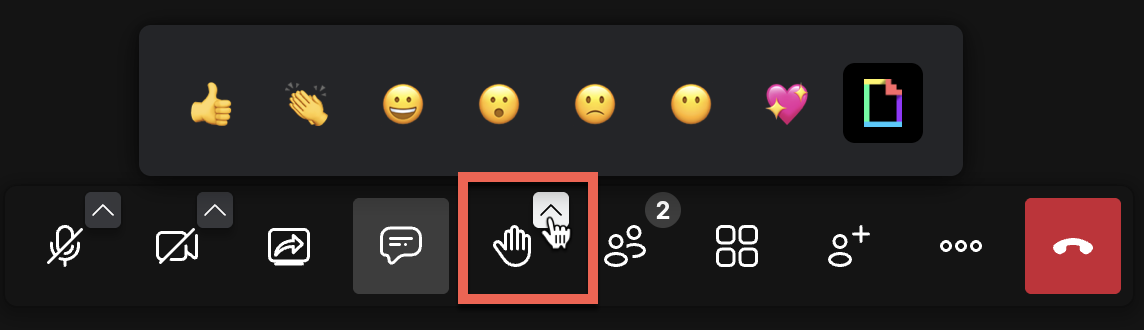
6) Toggle Participants View
7) Toggle Tile View
8) More Settings (All Settings)
8) Leave Meeting

FAQs
-
To log in to ConnectUC, you'll need to use your UCaaS username (typically extension@domain) or the email address associated with your UCaaS username. Your user account needs to have portal access permission (or be an account type that has portal access). By default, this is a role of Simple User or higher.
If your email address is associated with multiple extensions or other back-end systems, authentication may not work properly.
-
Yes, an Admin user may reset another user's password in the PBX by navigating to PBX > User > Advanced Settings > Account Security and selecting "Force Password Reset" for the selected user.
Once the button is selected, the user will be sent a reset password email and the user will also be forced out of ConnectUC to complete the password reset process.
Note: Mobile app users will only be forced to log out once the app is brought to the foreground.
-
You will find the version number you are using on the preferences page in the lower left. There's also a refresh button there to check for a newer version.
-
1The DID utilized must be SMS-enabled
The DID utilized must be assigned to a 10DLC Campaign. Must register a Brand and Campaign for 10DLC prior.
SMS Assigned to the user's extension (not to email).
If you want to see the shared SMS numbers in use, the shared option is just below where you assign the SMS to the user. The DID can then be used for both ReachUC and ConnectUC (we had some code that was moved to production to allow for this).
If a user has SMS enabled on their account but it's still not showing up in the left side menu, the user might have SMS to email enabled.
----
Function:
ReachUC will sync sent messages to ConnectUC in real time.Known Current Limitation:
ConnectUC will sync sent messages to ReachUC but not real time, but only on REFRESH of messages. -
Yes, if you wish to stop receiving SMS/MMS messages from a number, simply respond with the keyword 'BLOCK.' Sending 'BLOCK' as a response will ensure the recipient is blocked (Each keyword response is only applicable to the number sending the response).
If you wish to stop blocking a previously blocked number and resume incoming messages, simply respond with the keyword 'UNBLOCK.'
Additionally, you may also send 'MSGBL' (Abbreviation for 'Message Black List') to any number, and you will be provided with a list of currently blacklisted numbers, or confirmation that no numbers are currently being blocked.
Using the keywords BLOCK/UNBLOCK will not notify the wireless subscriber that they have been blocked or unblocked.
-
ConnectUC is installed as a Progressive Web App, and does not have a specific OS requirement.
We strive to have ConnectUC work with most Chrome based web browsers on Windows or Mac computers. For the best experience, we recommend that you use Chrome and ensure that the browser is up to date. ConnectUC Web/Desktop is not designed to work on mobile devices.
Also note that we do not currently support VDI Media Redirection. If you would like to assist with developing this please contact your support team.
-
Please visit our dedicated article regarding why this may occur and how to resolve the issue.
-
For security purposes, VM PINs are not accepted.
Users with the 'Integrations Only' scope can log in, but only if they have already been set up with a PBX password. This process will need to be completed by an Office Manager role or higher by accessing the user's profile and modifying the field.
-
On a Mac make sure that Chrome or Edge and their helpers have notifications enabled.
Also ensure that pop-ups are allowed by clicking on the Lock icon in the browser's address bar.
If you are using a Mac, ensure that notifications are enabled for the browser and browser helper that you're using in Settings -> Notifications.
-
ConnectUC uses encrypted WebSocket connections on ports 443 tcp and 9002 tcp. Additionally audio communications is over DTLS (TLS for UDP) on ports 30000 - 40000 udp.
-
ConnectUC utilizes a websocket on port 9002 to initiate communications. The user may have some filtering application on their computer or a firewall that might be blocking port 9002 tcp outbound.
If port 9002 is blocked the user will see a yellow warning banner.
-
Yes, please reference the dedicated click-to-dial for more information.
-
Any user can log out, and another user can log in on the same browser for functionality similar to hotdesking.
-
For ConnectUC to ConnectUC calls we're using Opus and FullBand quality (if you have stereo headset is the only to see a difference) when it was user to user call. For ConnectUC Web to Mobile would step down to WideBand. For ConnectUC Web to a carrier it is downgraded to g711 quality as this is what carriers require.
-
All traffic between ConnectUC and the back-end services is encrypted. All signaling is sent and received over encrypted WebSockets (SSL/TLS).
Voice traffic is encrypted with DTLS (TLS for UDP).
-
No. The messaging features built into ConnectUC are different than the messaging built into ReachUC. Once ConnectUC Mobile's Chat feature is done, it will have the proper messaging to communicate with ConnectUC Web.
-
To exclude users that you don't want to be seen, uncheck "List in Directory" on that user.
To exclude Ring Groups and other "System" users, locate the "Hide System Users" option at the very bottom right of the PBX Users page and uncheck the box. Once unchecked, all system users will be displayed, allowing you to toggle their "List in Directory" settings.
There's a routine that runs nightly to sync the PBX users with the ConnectUC user database that applies changes to the "List in Directory" setting. Unfortunately, at this time, there's no event that's triggered to make this change in real time.
-
If your ConnectUC user role is higher than a Basic User and you want to access the PBX portal, you should log into the PBX portal directly. This is a Fusion Auth related limitation, not ConnectUC.
-
DND status is supported across your desk phone and ConnectUC. Setting DND in one location will enable DND for both.
-
This feature is coming. Once released, you will be able to log in with an Outlook or Google account, and your contacts will sync and be available everywhere your contacts are listed.
-
Yes! In DashManager -> PBX -> ConnectUC Settings, enable the Attendant Console. There's an additional setting that allows the Attendant to also see all active calls in the console.
-
Yes, today, this is available inside your company from within the Chat feature. In the future, meetings will have a dedicated tab with more features, such as inviting external people and scheduling meetings.
-
Yes.
-
Yes, Bluetooth wireless headsets can be added in audio settings. Call control (HID support) on popular headsets will be available sometime in the future.
-
Yes. It is built as a PWA web app. Please reference the note at the bottom of the installation guide for detailed instructions for Windows and Mac.
-
Some ConnectUC settings are saved in the user's web browser application cache. If the user's browser is set to delete side data when the user exits their browser these settings may be deleted.
On the following page add "connectuc.io" to the list of sites "Allowed to save data on your device":
chrome://settings/content/siteData?search=dataedge://settings/content/siteData?search=data -
Sometimes I get a toast pop-up message "Parking call xxxx failed with error: Could not find active call for callid: xxxx" (where xxxx = some CallID).
This can happen when some inter-node events are very busy and queuing across the platform. What this means is that not all nodes know about all of the currently active calls.